💉 Frida's Gadget Injection on Android: No Root, 2 Methods
You will learn how to inject Frida's Gadget into Android application (APK) using 2 different methods without having to root your Android device.
You have 2 options to inject Frida's Gadget to Android application:
- Method 1: If targeted APK contains any native library (
<apk>/lib/arm64-v8a/libfromapk.so), then you can injectlibfrida-gadget.soas a dependency into the native library. - Method 2: If APK doesn't contain a native library, then you can inject
System.loadLibrarybytecode.
Basic use case: you've got a third-party APK (Android application package), and you want to debug/trace/explore/reverse-engineer it, and you have your personal Android phone which you don't want to root. It means you need Frida's Gadget.
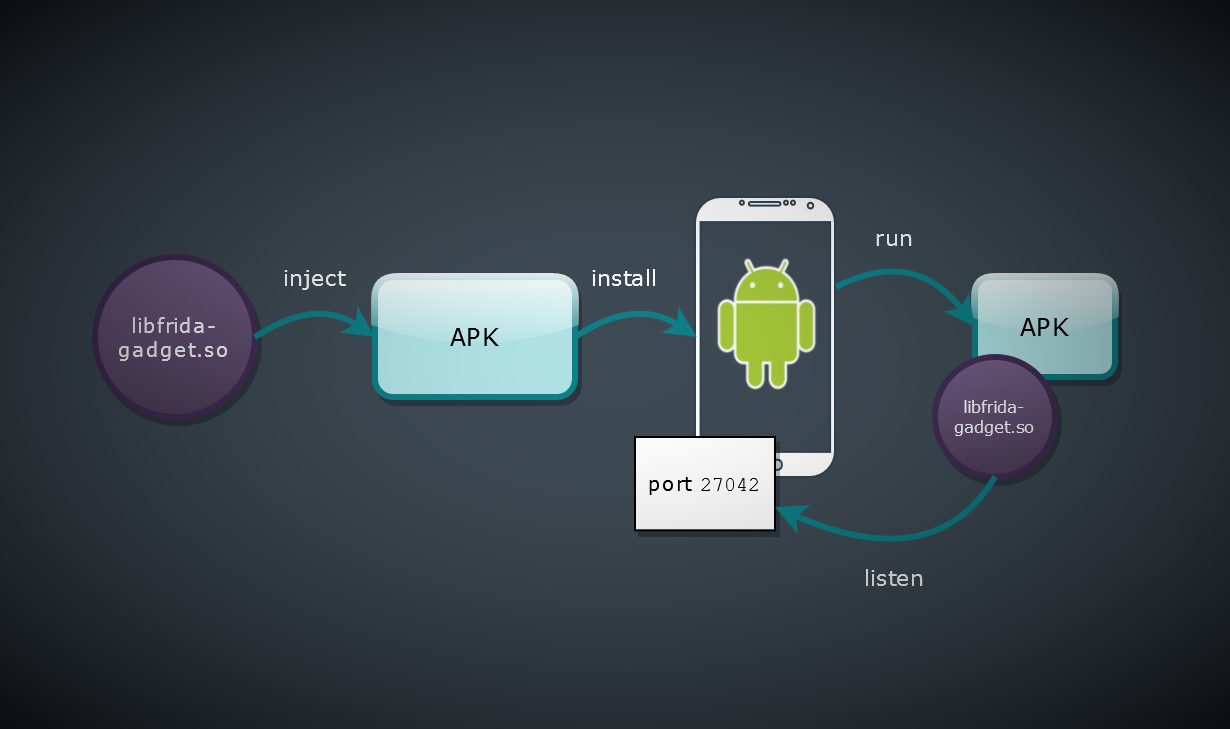
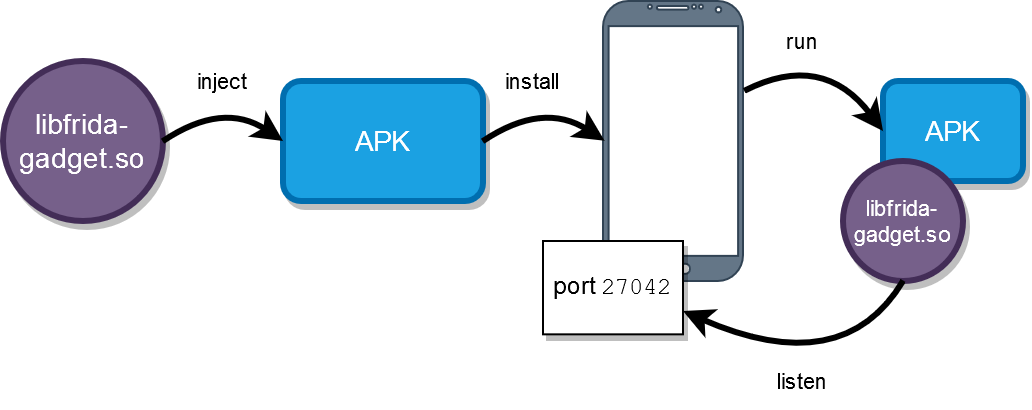
How it basically works
Note: where to get an APK
Google Play doesn't allow you to download APK directly. If you decide to analyze some APK, but you haven't got one yet, you have a bunch of options then: https://www.google.com/search?q=download+apk.
Method 1: Inject a libfrida-gadget.so as a dependency to a native library (JNI) inside of APK
📝 Basically, you need this article: https://lief.quarkslab.com/doc/stable/tutorials/09_frida_lief.html. The reason I've put my own steps here is a lot of caveats aiming to save time in future because of buggy versions of different tools, and because I'd like to escape all unnecessary steps I usually tend to follow.
✔️ For the shared library injection your APK should contain some native library (most probably a JNI library), and the injection is carried out by adding dependency to the native library.
⚠️ If the APK doesn't contain native library then jump to the method #2.
Steps
Let's say we want to inject libfrida-gadget.so to<target.apk>/lib/arm64-v8a/libfromapk.so.
- Download and unpack
frida-gadget>= 12.8.8 for Android for arm64 (or arm32) from here https://github.com/frida/frida/releases.
⚠️ WARNING: Frida Gadget fromwget https://github.com/frida/frida/releases/download/12.8.8/frida-gadget-12.8.8-android-arm64.so.xz unxz -d frida-gadget-12.8.8-android-arm64.so.xz12.7.0to12.8.7doesn't bring up the server, and the bug was solved here: https://github.com/frida/frida-core/issues/286. - Download and unpack your target APK.
⚠️ WARNING:# Destination would be a directory "target" apktool d -rs target.apk- Use
apktool>=2.4.1. -rsis to not decode resources and sources, it will save you time and keep your nerves while compiling the APK back.unzip/zipdoesn't always work - application may not bring up.
- Use
- Copy
frida-gadgetto the unpacked APK directory.cp frida-gadget-12.8.8-android-arm64.so target/lib/arm64-v8a/libfrida-gadget.so - Write a Python script (say
inject-gadget.py) to inject thefrida-gadgetusinglief(see installation instructions here: https://github.com/lief-project/LIEF).#!/usr/bin/env python3 import lief libnative = lief.parse("target/lib/arm64-v8a/libfromapk.so") libnative.add_library("libfrida-gadget.so") # Injection! libnative.write("target/lib/arm64-v8a/libfromapk.so") - Run the script - patch
libfromapk.soJNI.python3 inject-gadget.py - Check the injection succeeded.
readelf -d target/lib/arm64-v8a/libfromapk.soDynamic section at offset 0xb4000 contains 29 entries: Tag Type Name/Value 0x0000000000000001 (NEEDED) Shared library: [libfrida-gadget.so] - Re-pack APK.
# "target" is a directory with unpacked APK of the step 3. apktool b target - Sign APK.
I used "Uber APK signer": https://github.com/patrickfav/uber-apk-signer
⚠️ WARNING: Archive should have *.apk extension to make Uber Signer work!java -jar uber-apk-signer-1.1.0.jar -a ./target/dist/target.apk - Install APK.
⚠️ WARNING:adb install -r target/dist/target-aligned-debugSigned.apk- Allow untrusted third-party APK on your phone.
- Use
-rflag to "reinstall" APK.
- Check the
frida-gadgetpresence as described in the following chapter, but shortly:frida-ps -U - Trace the application (attach to gadget):
frida-trace -U Gadget
Pay attention that the Frida's Gadget should start after you trigger some use case in your targeted Android application which loads the native library. The application invokes System.loadLibrary to load libfromapk.so and the latter loads libfrida-gadget.so. It may happen at any time and not mandatory at the application start. Try to work with an app for a while. For example, if you injected into libcrypto.so, then do some operations which use encryption. And then check again. Basically, application should freeze 💤 at the moment of gadget spawn. Also you can try to inject to another library.
Method 2: Injecting into bytecode
The method is basically described here: https://koz.io/using-frida-on-android-without-root/
Inject a System.loadLibrary("frida-gadget") call into the bytecode of the app, ideally before any other bytecode executes or any native code is loaded. A suitable place is typically the static initializer of the entry point classes of the app, e.g. the main application Activity, found via the manifest. An easy way to do this is to add the following smali code in a suitable function:const-string v0, "frida-gadget"
invoke-static {v0}, Ljava/lang/System;->loadLibrary(Ljava/lang/String;)V
➡️ A "suitable place" could be a constructor of a main activity right above return statement which you can find in the AndroidManifest.xml (look for an <application>... <activity>... tag).
# direct methods
.method constructor <init>(Lcom/some/packet/activity/MainActivity;)V
.locals 0
....
const-string v0, "frida-gadget"
invoke-static {v0}, Ljava/lang/System;->loadLibrary(Ljava/lang/String;)V
return-void
.end methodPay attention that in this case Frida gadget will be loaded at the application start, so you have to connect to the one quickly from the computer:
frida-trace -U GadgetSteps
- Disassemble
apktool d -r target.apk- Use apktool >= 2.4.1.
- Use -r to keep your nerves at the re-packing stage which is a buggy thing usually (let me drop details here).
- Download
wget https://github.com/frida/frida/releases/download/12.8.8/frida-gadget-12.8.8-android-arm64.so.xz unxz -d frida-gadget-12.8.8-android-arm64.so.xz- Use frida-gadget >= 12.8.8, see https://github.com/frida/frida-core/issues/286.
- Copy
cp frida-gadget-12.8.8-android-arm64.so target/lib/arm64-v8a/libfrida-gadget.so - Find a
smalifile which contains main activity class.
orgrep -rn MainActivity
⚠️ Your APK may have main activity with a different class name. Try to investigate!grep -rn activity - Edit
1 Edittarget/smali/.../A.smali(smali file with main activity).
2 Add aloadLibrarycall there as shown below:.method constructor <init>(Lcom/some/packet/activity/MainActivity;)V .locals 0 .... # Add these 2 lines of code right before return! const-string v0, "frida-gadget" invoke-static {v0}, Ljava/lang/System;->loadLibrary(Ljava/lang/String;)V return-void .end method - Build
apktool b target - Sign
java -jar uber-apk-signer-1.1.0.jar -a ./target/dist/target.apk - Install
adb install -r ./target/dist/target-aligned-debugSigned.apk
- Check the
frida-gadgetpresence as described in the following chapter, but shortly:frida-ps -U - Trace the application (attach to gadget):
frida-trace -U Gadget
For more details about each step see description of the method #1.
Check whether injection succeeded
In both cases you need to know whether frida-gadget has been injected successfully.
- When Frida Gadget starts, it prints a log with
Fridatag.adb logcat | grep -i frida
If you see an error with03-24 13:01:24.561 21645 22797 I Frida : Listening on 127.0.0.1 TCP port 27042Fridatag, it still means that injection succeeded basically, and Gadget is trying to start, but something else is wrong and additional investigation is needed (e.g. see how to fix "Error: Unable to create socket"). - When Frida Gadget spawns it tries to create a listening socket on the port 27042. Use
adbto connect to device and check the presense of the server.adb shell netstat -ln | grep 27042tcp 0 0 127.0.0.1:27042 0.0.0.0:* LISTEN - Use
frida-psto check whether Frida Gadget created a listening socket on device successfully. Use-Uargument to verify your device via USB.frida-ps -UPID Name ----- ------ 21645 Gadget
Error: Unable to create socket
You may see this error (if not, jump to the next chapter about how to research your application):
F Frida: Failed to start: Unable to create socket: Permission denied
It means that APK doesn't have INTERNET permissions. Check this in AndroidManifest.xml:
apktool d target.apk
I: Loading resource table...
I: Decoding AndroidManifest.xml with resources...
...
grep INTERNET target/AndroidManifest.xml
You will probably not see the corresponding permission (you see empty output from grep).
Add the next line to AndroidManifest.xml in this case:
<uses-permission android:name="android.permission.INTERNET"/>
And re-pack APK:
apktool b target
What's Next ⏭️
Research what files are being used
For example, I started with a script to trace any request to filesystem which is the basic step to start from.
frida --codeshare FrenchYeti/android-file-system-access-hook -f com.example.app --no-pauseIf you want to modify the initial script, then download it from codeshare (e.g. to tracefs.js), modify it, and use like the following:
frida -f tracefs.js -U GadgetResearch data encryption
Often you will need to catch a moment when application starts to encrypt some data, so you could print that data before it's going to be encrypted. You can use my code snippet to intercept Java Crypto API, to print a symmetric key and data right before the final encryption step.
frida --codeshare fadeevab/intercept-android-apk-crypto-operations -U GadgetThis code snippet is a simple and easy point to start, and there are other powerful cryptography interceptors on https://codeshare.frida.re (e.g. https://codeshare.frida.re/@dzonerzy/aesinfo/).
Research more
- Go to https://github.com/iddoeldor/frida-snippets and take there anything you need to trace with
frida. - https://codeshare.frida.re is an authentic source of Frida code snippets.
And that's it.